50% discount on my Packt Publishing Books!

KF6GPE50

Shameless plug — Packt is running a special for the three books I’ve written for them. If you’ve been thinking about Qt Creator or JavaScript Object Notation and haven’t taken the plunge, here’s a reason to do so! Follow one of the links below, and use the code ‘KF6GPE50’ at checkout for your discount!

JavaScript JSON Cookbook

Application Development with Qt Creator, 2nd Edition

Application Development with Qt Creator

Providing images to Qt Quick with QQuickImageProvider…

I have been meaning to post this for a while, although no one’s asked me specifically about it.

A couple of years ago, while at Nokia, I wrote this post on QML and image providers for Qt 4.x.

While revising my latest book on Qt this fall, I learned that in Qt 5.x, the QDeclarativeImageProvider class is now the QQuickImageProvider class. The interface remains the same, so the guidance still stands — just replace one with the other.

If you want more details, stay tuned — my book should be out in the next couple of weeks, and I’ll post a link.

And another book is out!

I’m excited to announce that my new book, Application Development with Qt Creator, is now available for sale at Packt and available for pre-order at Amazon!

I love Qt — it is one of the best frameworks I’ve ever worked with for any kind of development in C++. I was excited when Packt approached me to write a mini-guide on getting started with Qt Creator, Qt’s cross-platform IDE. As written, the book covers everything you need to know to get started using Qt Creator, from installing the IDE to compiling, editing, debugging, optimization, and localization. There’s also a chapter on using Qt for mobile development on Android.

This book is aimed at developers new to Qt and IDEs in general. If you’re just getting started programming, maybe studying on your own or taking a college course, you’ll want a copy.

Which Qt XML parser are you?

Do you like getting the whole story all at once? Or are you more the kind of person that wants to hear things bit by bit, and think about each piece as it comes, and respond a little at a time?

That’s essentially the question to ask when choosing an XML parser to use in Qt. There’s the QDomDocument, which parses your XML document into a fully-navigable document object model (DOM) in memory that you can query, traverse, and change. And then there’s the QXmlStreamReader parser, which reads from a stream and lets you make incremental queries for entities and attributes as you go along. Finally, there’s also the QXmlSimpleReader parser, a simple SAX-like parser that can read the whole document in one shebang or incrementally and calls callbacks on objects you register when the parser encounters entities and attributes.

Which should you use in your project?

There’s a tradeoff between the simplicity of your code and the amount of memory you’re willing to sacrifice at run-time. DOM-based parsing as provided by QDomDocument is awesome, but comes at a cost—the parser has to churn over the entire document as it creates the DOM, and essentially mirrors the document in RAM in with its DOM. The streaming parser is great for larger documents, but requires that you build more structure into your parser, using that structure to mirror the internal hierarchy in your XML document.

For years, I’ve been an avid proponent of using stream-based parsers—readers of Dan’s and my book will remember us exhorting you to use stream-based parsers for mobile, because you can read the data as it comes over the stream and build your document representation in core as efficiently as possible. In a past life, I actually wrote a streaming XML parser for Qualcomm BREW, again adhering to the doctrine that you should hold as little in memory as possible, and process what comes in over the air (or off the wire) as quickly as possible, rather than buffering and processing. If you’re parsing a very large document, or if you’re working on very small devices (think legacy Symbian or Maemo), streaming is definitely the way to go.

While I still think for the large majority of applications that’s probably still the best approach, I had the opportunity recently to use a DOM parser in a commercial setting on a project, and wow, was it easy! In my case, I was parsing small documents—typically well under fifty kb—walking the DOM quickly and reducing their structure to a compact in-memory representation and discarding the DOM. I could have done the same thing with a streaming parser, but here the time it took me to write the code was of the essence; we wanted to get something up and running as quickly as possible. And this was a fast way to do it.

Someday, I’d like to write a benchmark app that uses all three methods to parse a longish (say, 250 kb) document and report on both performance and heap usage. It would also be interesting to see download-and-parse times for the three approaches over a benchmark network like 3G cellular, because depending on the application and document size, network performance becomes a factor, too. Until I can point at hard numbers, though, I’d advise you to consider both the DOM and streaming approach, and choose the approach that best balances network throughput, memory usage, and the amount of time and effort it takes you to get your project off the ground.

A forest of trees!

I recently needed a spatial index for some data I was working with at work, and decided to rough out both a quad tree and a k-d tree implementation for Qt.

Indexing data spatially is important if you have a lot of objects organized spatially, and need to do queries by an object’s location, rather than a single-dimensional key such as an ID. Qt has a framework for doing this in the context of the QGraphicsFramework, but doesn’t have generalized container classes that index along multiple dimensions — think, for example, of a multi-dimensional QMap.

I implemented the quad tree largely from scratch, looking at wikipedia and a couple implementations such as the one here. My quad tree uses C++ templates to abstract the data type, so you can stick anything in it (as long as it can be put in a QList; the underlying store uses QList for object management). Quad trees come up a lot in collision detection in computer graphics and gaming, where you want to know if an object is close enough to another object to collide, but don’t want to search through lots of objects and do collision detection on each object. It works by recursively subdividing the plane containing the objects, performing additional subdivisions each time a region contains more than a specific number of objects.

I cheated when it came to the k-d tree, because there’s a great C implementation on code.google.com that did precisely what I needed. Because I needed to store QVariants in the k-d tree, I just wrapped the entire C library in a Qt class, making the C code static to my implementation. It’s not quite as sexy as a templated version, because it’ll only store objects you can wrap in a QVariant, but for my application it was enough, and in the future if I have a different kind of object I want to store, it’s easy enough to make it storable as a QVariant, too. k-d trees are more general than quad trees, operating in more dimensions than two as they subdivide the search space.

Neither of these implementations are truly “high performance” — for clarity and ease of debugging, they use Qt’s data structures under the hood, which are fairly performant but not as high performance as managing all the data out of the application’s heap using pointers alone. This is especially true for the find methods, which return copies of the data stored in the trees rather than pointers to the actual data. This is, I believe, correct in my case, where I don’t want to expose the internal structure of my data, and where I’m using Qt classes that use references and copy-on-write semantics anyway. However, if you’re looking to squeeze every last bit of performance from your spatial index, you probably don’t want to start with the code you’ll find here. Nonetheless, for general computational tasks, these should serve you quite well.

You can find both of the implementations and a little standard I/O app for using them here.

Deploying Qt Quick Applications that rely on Qt Mobility on Windows…

Whew! Some things seem to take forever for me to figure out!

Here’s the scenario: we’re working on a Qt Quick (QML and C++) application at the lab to run on Microsoft Windows. We’d like to deploy the app to a bunch of study participants to use for a week or so. It’s obviously not practical for me to go around and set everybody up with Qt, Qt Mobility, and build our app. (Especially not this app; we’re using the Qt 4.8 prerelease at this point!). So we need to build a Windows installer that includes the Qt DLLs, our app and its QML, and the Qt Mobility plugins we’re using. We’re using Qt Mobility in our QML — so we need to include the Qt Mobility plugins for Qt Quick, not just the Qt Mobility libraries.

Packaging a Qt application for Windows is straightforward — just follow these instructions for packaging as a shared library. But what about the Qt Quick plugins for Qt Mobility we need?

Well, Qt Quick supports modules for that, as described here. In fact, if your application required QtWebKit’s Qt Quick plugin, you’d create a QtWebKit directory, stick a qmldir file with the line

plugin QtWebKit

copy qtwebkitplugin.dll into the directory you made and Bob’s your uncle!

We use QtMultimediaKit, so at first I created a QtMultimediaKit directory, created a qmldir file in that directory, and copied QtMultimediaKit1.dll from my Qt Mobility build output directory to the QtMultimediaKit directory I’d created.

No luck — in fact, the app just launches and shows nothing. (To add insult to injury, my app uses Qt’s support for Open GL, so not only did I not get the black screen characteristic of a QML error, but I got junk in the application window and no errors on the console.)

Turns out that QtMultimediaKit1.dll goes in the same directory as the application, and the declarative plugin file is somewhere else! If you look in the plugins directory, you’ll see a declarative directory, and the actual Qt Quick declarative plugin you’re looking for is in there! In my case, I needed to copy plugins/declarative/multimedia/release/declarative_multimedia.dll to a new directory QtMultimediaKit, create a single qmldir file that read

plugin declarative_multimedia

and put that adjacent to my application executable.

So, the resulting files and directories for me look something like:

imageformats/qgif4.dll
imageformats/qjpeg.dll
QtMultimediaKit/declarative_multimedia.dll
QtMultimediaKit/qmldir
msvcr90.dll
QtCore4.dll
QtDeclarative4.dll
QtGui4.dll
QtMultimedia4.dll
QtMultimediaKit1.dll
QtNetwork4.dll
QtOpenGL4.dll
QtScript4.dll
QtSql4,dll
QtXml4.dll
QtXmlPatterns4.dll
myapplication.exe

Now off to learn how to make a Windows installer. I think I’ll try Inno Setup.

Using an Image Provider to Share Images from a C++-hosted Data Model to QML

In a previous post, I demonstrated how to use an image provider for a relatively simple use case: loading QML from the application’s resources. Another common question I’ve heard is how to do the same from an application model; say you’ve got an existing C++ model that carries images for each item; how do you share those images with QML? You may want to do that if you have existing C++ code for a data model that renders the image data for each item (say, by compositing several different things from a model, such as its description and date).

It’s not hard: again, you need to write a QDeclarativeImageProvider that returns the appropriate images given names that the QML will derive from your model. Of course, you also need to extend your model’s roles to include a role for the image name; your model code will populate this role with a unique name for each item’s image, and the QML will use this role’s value in Image elements’ source property to reference the image. In turn, the declarative runtime will use the resulting source values to request the images from the image provider, which then provides the desired images for rendering.

Here’s what I did for a pixmap provider in a recent project, naming images in my model image://model/---, where — is a unique identifier for the item in the model.

The image provider provides only pixmaps, and is a little more sophisticated than the last one I showed you, because it needs to work with a model, whose data can change underneath us:

class ModelIndexProvider : public QObject, public QDeclarativeImageProvider
{
    Q_OBJECT
public:
    ModelIndexProvider(QAbstractItemModel& model, int pathRole, int pixmapRole, 
        QObject* parent = 0);
    ~ModelIndexProvider();
    QPixmap requestPixmap(const QString& id, QSize* size, const QSize& requestedSize);

public slots:
    void dataUpdated(const QModelIndex & topLeft, const QModelIndex & bottomRight);
    void dataDeleted(const QModelIndex & parent, int start, int end);
    void dataReset();

private:
    QAbstractItemModel& mModel;
    int mPathRole;
    int mPixmapRole;
    QMap mPixmapIndex;
};

The class uses a QMap to provide an index from the name of each image in the model to its model index; this is used by requestPixmap when it’s passed an id originally from the model and needs to determine the image’s index into the model. requestPixmap looks like this:

QPixmap ModelIndexProvider::requestPixmap(const QString& id, QSize* size, const QSize& requestedSize)
{
    QString key = QString("image://model/%1").arg(id);
    QModelIndex index = mPixmapIndex[key];
    QPixmap image = mModel.data(index, mPixmapRole).value<QPixmap>();
    QPixmap result;

    if (requestedSize.isValid()) {
        result = image.scaled(requestedSize, Qt::KeepAspectRatio);
    } else {
        result = image;
    }
    *size = result.size();
    return result;
}

This code just looks up the model index of the image given the image name, and then scales the image already in the model before returning it to the caller.

Of course, the mapping between name and index must be maintained; the code performs the necessary registration to watch the model at construction time:

ModelIndexProvider::ModelIndexProvider(QAbstractItemModel& model, 
    int pathRole, int pixmapRole, 
    QObject* parent) :
    QObject(parent),
    QDeclarativeImageProvider(QDeclarativeImageProvider::Pixmap),
    mModel(model),
    mPathRole(pathRole),
    mPixmapRole(pixmapRole)
{
    // For each pixmap already in the model, get a mapping between the name and the index
    for(int row = 0; row < mModel.rowCount(); row++) {
        QModelIndex index = mModel.index(row, 0);
        QString path = mModel.data(index, mPathRole).value<QString>();
        mPixmapIndex[path] = index;
    }
    connect(&mModel, SIGNAL(dataChanged(QModelIndex,QModelIndex)),
            this, SLOT(dataUpdated(QModelIndex,QModelIndex)));
    connect(&mModel, SIGNAL(rowsRemoved(QModelIndex,int,int)),
            this, SLOT(dataDeleted(QModelIndex,int,int)));
    connect(&mModel, SIGNAL(modelReset()),
            this, SLOT(dataReset()));
}

Notice how the constructor takes the roles for the image path and image itself; this way instances of the ModelIndexProvider can be used in more than one project, or more than once in a project, each for different model roles that contain QPixmap instances. The constructor begins by creating the initial index of image names and model indices, and then connects to the model's signals that indicate when the model has changed.

Handling changes isn't difficult; in my case because the model doesn't carry that many items I just recreate the index any time the data is changed or deleted. If you have a complex model that changes a lot, you might want to be smarter about cache invalidation --- or drop the cache entirely and just sequentially search the model for the bitmap data when it's requested, as the QML viewer's pretty good about caching the resulting bitmaps anyway.

void ModelIndexProvider::dataUpdated(const QModelIndex& topLeft, const QModelIndex& bottomRight)
{
    // For each pixmap already in the model, get a mapping between the name and the index
    for(int row = 0; row < mModel.rowCount(); row++) {
        QModelIndex index = mModel.index(row, 0);
        QString path = mModel.data(index, mPathRole).value<QString>();
        mPixmapIndex[path] = index;
    }
}

void ModelIndexProvider::dataDeleted(const QModelIndex&, int start, int end)
{
    // For each pixmap already in the model, get a mapping between the name and the index
    for(int row = 0; row < mModel.rowCount(); row++) {
        QModelIndex index = mModel.index(row, 0);
        QString path = mModel.data(index, mPathRole).value<QString>();
        mPixmapIndex[path] = index;
    }
}

void ModelIndexProvider::dataReset()
{
    mPixmapIndex.clear();
}

All that remains is to register the image provider with the Qt declarative runtime, as you saw here!

One important thing to remember is that QML tracks your images by the image source, which is a string, not the bitmap behind the source. Even if your bitmap data is in the model in a role as it is here, changing the bitmap won't update the QML! Instead, you need to change the underlying source name to indicate to the QML that it needs to load a new bitmap. In my code, I do this by appending a timestamp in milliseconds to the source attribute; whenever my bitmap changes I update the model with the same image path and a new timestamp, which triggers a model invalidation in the QML declarative view and a subsequent bitmap fetch and redraw.

Here's the code if you want to try it for yourself.

Using an Image Provider to Supply Images to QML Applications from Qt Resources

Your hybrid QML/C++ application can load its QML from a Qt resource, but what about images? If you load the QML from a Qt resource, then all of your images are loaded from the Qt resource segment as well. But what if you want to supply your QML as files (or deliver them over the network)?

Your C++ application can provide images to the Qt declarative runtime through an image provider, so that in your QML you can write something like

Image {
    source: "image://myprovider/image.png"
}

and the QML runtime will query your application’s image provider for a provider registered to the name myprovider, asking that provider for the image named image.png. Using the image provider framework, it’s easy to load images from your application’s resource segment: all you need to do is provide a custom image provider that loads images from the resource segment and register it with the Qt declarative runtime.

Qt image providers are subclasses of QDeclarativeImageProvider, a class that has methods to return a QPixmap or a QImage given the image’s name. It’s up to you to decide how to organize and fetch those images when you implement an image provider; an obvious way when fetching images from the resource segment is to use the resource name. Our resource-based image provider looks like this:

class ResourceImageProvider : public QDeclarativeImageProvider
{
public:
    ResourceImageProvider(QDeclarativeImageProvider::ImageType type);
    ~ResourceImageProvider();
    QImage requestImage(const QString& id, QSize* size, const QSize& requestedSize);
    QPixmap requestPixmap(const QString& id, QSize* size, const QSize& requestedSize);
};

The constructor accepts an indicator as to whether the returned images provided are pixmaps or images; while pixmaps are faster to draw, they reside in the graphics subsystem’s memory, which is typically a scarce resource, so you should always be sure to use this judiciously.

The image provider gives images to the Qt declarative runtime through the requestImage and requestPixmap methods, which return a QImage or QPixmap, respectively. Each of these methods take the identifier of the image to return, a desired size for the image, and a pointer where to place the actual size of the image that’s returned. The image provider should try to match the requested size if it’s able, although depending on the QML, can accept a smaller or larger image and reflow the QML layout—that depends, of course, on the QML element’s anchors property, of course.

The actual image provider is simple:

ResourceImageProvider::ResourceImageProvider(QDeclarativeImageProvider::ImageType type) :
    QDeclarativeImageProvider(type)
{
    // This space intentionally left blank.
}

ResourceImageProvider::~ResourceImageProvider()
{
    // This space intentionally left blank.
}

QImage ResourceImageProvider::requestImage(const QString& id, QSize* size, const QSize& requestedSize)
{
    QString rsrcid = ":/" + id;
    QImage image(rsrcid);
    QImage result;

    if (requestedSize.isValid()) {
        result = image.scaled(requestedSize, Qt::KeepAspectRatio);
    } else {
        result = image;
    }
    *size = result.size();
    return result;
}

QPixmap ResourceImageProvider::requestPixmap(const QString& id, QSize* size, const QSize& requestedSize)
{
    QString rsrcid = ":/" + id;
    QPixmap image(rsrcid);
    QPixmap result;

    if (requestedSize.isValid()) {
        result = image.scaled(requestedSize, Qt::KeepAspectRatio);
    } else {
        result = image;
    }
    *size = result.size();
    return result;
}

The image and pixmap loaders do essentially the same thing: create a Qt resource identifier from the incoming image id, load the image, scale it to the requested size, and return the requested image (as a pixmap in the requestPixmap case) along with its size.

Once you’ve created an image provider, you need to make it available to the QDeclarativeView displaying your QML. In a previous post, I showed you how to create a QDeclarativeView that displays your QML in a QMainWindow; you can use the same code plus the following snippet to add your image provider to the Qt declarative runtime:

    QDeclarativeView* view = new QDeclarativeView(window);
    ...
    view->engine()->addImageProvider(QLatin1String("qrc"), new ResourceImageProvider(QDeclarativeImageProvider::Pixmap));

This code pokes at the QDeclarativeView‘s QDeclarativeEngine, giving it an instance of your image provider that returns pixmaps for images in the namespace beginning with qrc. Once you’ve done this, you can now load images in your QML from your Qt resource segment using things like:

Image {
    source: "image://qrc/image.png"
}

In a later post, I’ll show you how you can use an image provider for another common C++ integration point: loading images directly from a C++-hosted data model.

Although you probably already know this, it’s worth pointing out an important detail about Qt resources: they’re in your application’s read-only segment. If your application is running on a memory-contrained platform like a mobile device, it’s worth choosing carefully whether you place your resources in a Qt resource segment or as additional files on the file system packaged with your application. If they’re in the data segment, it’s possible they’ll be loaded into memory when your application is launched (for example, when started from a memory card on Symbian, which only performs demand-paging from the internal store). Consequently, putting a lot of images in your application’s resources can lead to slower load times and even out-of-memory errors on some platforms, so it’s best to do this with small resources that simply must be loaded quickly like bitmaps for small user interface controls and the like.

You can download the code, too!.

Transparent windows with QML…

QMLViewer doesn’t do it — what if you want your QML rendered in a transparent window (say, over the desktop)? The short answer is that you’ll need to write your own QML player app, something I’ve talked about before. However, you need to tweak a few things in the process.

Before you begin, it’s worth noting that this doesn’t work everywhere — transparency is subject to the vagaries of the platform’s windowing system and windowing manager. For example, this bit of code I’m about to show you worked fine on Windows 7, Maemo, and MeeGo (netbook), but not Ubuntu 10.04 with my particular graphics card, but did on the Ubuntu machine next to me. (I’ve not yet taken the time to try it on Mac OS X at all—a curious state of affairs, given that Mac OS X is my “home” platform of choice. But anyway…) It’s also worth noting that transparency can slow things down, as you’re going to be asking the graphics subsystem to do the necessary blending and compositing, which means more processing spent in rendering. This translates to lower battery life on mobile devices, of course.

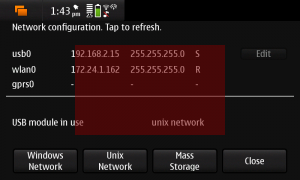
Caveats aside, what we’re trying to do is something like this:

Translucent QML-rendering window running on an N900 with PR 1.3.
Screen shot of translucent window & QML.

My test QML is very simple:

import Qt 4.7
Rectangle {
    id: window
    width: 800
    height: 480
    color: "transparent"
    Rectangle {
        width: 400
        height: 240
        anchors.centerIn: parent
        color: "red"
        opacity: 0.5
    }
}

The key here is that the items you want to be transparent—such as the main item in the QML containing other items—should have their color property set to "transparent".

However, to do this, the main window needs to be transparent as well. Moreover, On X systems like MeeGo and Maemo, not only does it need to be transparent, but frameless as well. To do this, you need to configure the QMainWindow appropriately at construction, and set the Qt::WA_TranslucentBackground attribute for the QML view. You also need to set its palette to render using transparency. Thus, the code to display the QML might look something like this:

int main(int argc, char *argv[])
{
    QApplication app(argc, argv);
    QMainWindow window(0, Qt::FramelessWindowHint);
    QDeclarativeView view;
    QPalette palette;

    // We'd sure like this window to be translucent if we're able
    window.setAttribute(Qt::WA_TranslucentBackground, true);
    view.setAttribute(Qt::WA_TranslucentBackground);
    palette.setColor(QPalette::Base, Qt::transparent);
    // The only thing we show is the declarative view.
    window.setCentralWidget(&view);
    view.setPalette(palette);
    view.setSource(QUrl("qml/translucent/main.qml"));
    window.show();
    // Pass control to Qt's event loop
    return app.exec();
}

(To test this, I just created a new Qt Quick Application, and replaced the main.cpp’s main function with the code you see above and the QML with my QML in the previous listing. If you try this, don’t forget to include the necessary headers like QDeclarativeView,, too!)

The code’s pretty simple: create an instance of the main window, indicating that it has no parent and should be frameless. Next, set the WA_TranslucentBackground for both the main window and the QDeclarativeView responsible for rendering the QML. Finally, configure a transparent palette for the QML rendering control, and then set its palette to that palette before giving it the QML to render and showing the window.